11/13 무료 aws + springboot 서버 구축

11. SSL 인증

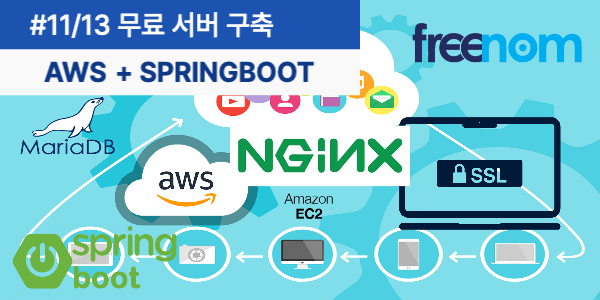
Let’s Encrypt 와 Certbot을 이용한 ssl 무료 인증서를 발급 받는 방법에 대해서 알아 보겠습니다.

1. Diffie-Hellman 키 생성

https 인증서를 받기 위해서는 키가 필요합니다. 이 키 생성은 디피와 헬만이 1976년도에 발표한 비밀키 교환 방식의 알고리즘을
이용하여 생성합니다.이 알고리즘을 이용하여 4096 bit의 키를 생성하겠습니다. 아래 명령어로 키를 생성하는데 대략 10분정도 소요 되었습니다.
이키를 이용해서 https에서 비밀키를 교환하여 안정한 https 통신을 할수 있으므로 반드시 진행해야 되는 사항입니다.

1
ubuntu@goodsaem:~$ sudo openssl dhparam -out /etc/nginx/conf.d/ssl-dhparams.pem 4096
1
2
3
enerating DH parameters, 4096 bit long safe prime, generator 2
This is going to take a long time
...............................................................

2. Let’s Encrypt + Certbot 무료인증

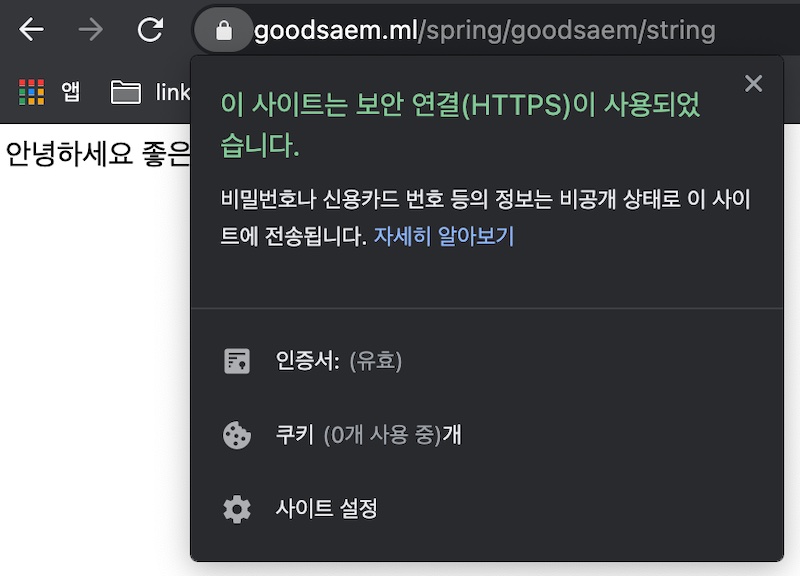
Let’s Encrypt 는 사용자에게 무료로 SSL/TLS 인증서를 발급해 주는 기관 입니다. 한번 발급 받으면 90일간 사용이 가능하며
만료 30일전에 메일로 내용을 통보하면 그때 다시 갱신이 가능합니다. 인증서 발급은 certbot certbot-auto 를 이용하여
발급 및 갱신합니다.

certbot 등록을 위해 repository 등록을 진행합니다.

1
2
3
4
5
ubuntu@goodsaem:~$ sudo apt-get update
ubuntu@goodsaem:~$ sudo apt-get install software-properties-common
ubuntu@goodsaem:~$ sudo add-apt-repository universe
ubuntu@goodsaem:~$ sudo add-apt-repository ppa:certbot/certbot
ubuntu@goodsaem:~$ sudo apt-get update

certbot을 설치합니다.

1
ubuntu@goodsaem:~$ sudo apt-get install certbot

certbot nginx 플러그인을 설치 합니다.

1
ubuntu@goodsaem:~$ sudo apt-get install python-certbot-nginx

nginx에 서버 이름을 변경하기 위해 아래와 같이 입력합니다.

1
ubuntu@goodsaem:~$ sudo vi /etc/nginx/conf.d/default.conf

서버 네임을 freenom에서 발급받은 도메인으로 지정해 줍니다.

3 line

1
2
3
4
5
6
7
8
9
10
11
12
13
14
15
16
17
18
19
20
21
22
23
24
25
26
27
28
29
30
31
32
33
34
35
36
37
38
39
40
41
42
43
44
45
46
47
48
49
50
51
server {
listen 80;
server_name goodsaem.ml;

#charset koi8-r;
#access_log /var/log/nginx/host.access.log main;

location / {
root /usr/share/nginx/html;
index index.html index.htm;
}

location /spring {
proxy_pass http://localhost:9090/spring;
proxy_set_header X-Real-IP $remote_addr;
proxy_set_header X-Forwarded-For $proxy_add_x_forwarded_for;
proxy_set_header Host $http_host;
}

#error_page 404 /404.html;

# redirect server error pages to the static page /50x.html
#
error_page 500 502 503 504 /50x.html;
location = /50x.html {
root /usr/share/nginx/html;
}

# proxy the PHP scripts to Apache listening on 127.0.0.1:80
#
#location ~ \.php$ {
# proxy_pass http://127.0.0.1;
#}

# pass the PHP scripts to FastCGI server listening on 127.0.0.1:9000
#
#location ~ \.php$ {
# root html;
# fastcgi_pass 127.0.0.1:9000;
# fastcgi_index index.php;
# fastcgi_param SCRIPT_FILENAME /scripts$fastcgi_script_name;
# include fastcgi_params;
#}

# deny access to .htaccess files, if Apache's document root
# concurs with nginx's one
#
#location ~ /\.ht {
# deny all;
#}
}

이제 아래 certbot 명령어를 통해서 ssl 인증서를 발급받습니다. 인증서 발급시
사용할 admin email 주소와 이용약관 동의 옵션을 지정하여 인증서 발급을 받겠습니다.

1
ubuntu@goodsaem:~$ sudo certbot --nginx --email goodsaem@protonmail.com --agree-tos

위에 명령어를 입력하면 아래와 같은 형태로 진행되는데요 중요한 부분만 설명하겠습니다.

  • 6 라인에 추가할 https 도메인이 보입니다.
  • 9 라인에서 엔터를 입력합니다.
  • 24 라인에서 2을 입력합니다. (http로 요청이 들어오면 https 로 redirect 하겠다는 의미 입니다.)
1
2
3
4
5
6
7
8
9
10
11
12
13
14
15
16
17
18
19
20
21
22
23
24
25
26
27
28
29
30
31
32
33
34
35
36
37
38
39
40
41
42
43
44
45
Saving debug log to /var/log/letsencrypt/letsencrypt.log
Plugins selected: Authenticator nginx, Installer nginx

Which names would you like to activate HTTPS for?
- - - - - - - - - - - - - - - - - - - - - - - - - - - - - - - - - - - - - - - -
1: goodsaem.ml
- - - - - - - - - - - - - - - - - - - - - - - - - - - - - - - - - - - - - - - -
Select the appropriate numbers separated by commas and/or spaces, or leave input
blank to select all options shown (Enter 'c' to cancel):
Obtaining a new certificate
Performing the following challenges:
http-01 challenge for goodsaem.ml
Waiting for verification...
Cleaning up challenges
Deploying Certificate to VirtualHost /etc/nginx/conf.d/default.conf

Please choose whether or not to redirect HTTP traffic to HTTPS, removing HTTP access.
- - - - - - - - - - - - - - - - - - - - - - - - - - - - - - - - - - - - - - - -
1: No redirect - Make no further changes to the webserver configuration.
2: Redirect - Make all requests redirect to secure HTTPS access. Choose this for
new sites, or if you're confident your site works on HTTPS. You can undo this
change by editing your web server's configuration.
- - - - - - - - - - - - - - - - - - - - - - - - - - - - - - - - - - - - - - - -
Select the appropriate number [1-2] then [enter] (press 'c' to cancel): 1

- - - - - - - - - - - - - - - - - - - - - - - - - - - - - - - - - - - - - - - -
Congratulations! You have successfully enabled https://goodsaem.ml

You should test your configuration at:
https://www.ssllabs.com/ssltest/analyze.html?d=goodsaem.ml
- - - - - - - - - - - - - - - - - - - - - - - - - - - - - - - - - - - - - - - -

IMPORTANT NOTES:
- Congratulations! Your certificate and chain have been saved at:
/etc/letsencrypt/live/goodsaem.ml/fullchain.pem
Your key file has been saved at:
/etc/letsencrypt/live/goodsaem.ml/privkey.pem
Your cert will expire on 2021-06-23. To obtain a new or tweaked
version of this certificate in the future, simply run certbot again
with the "certonly" option. To non-interactively renew *all* of
your certificates, run "certbot renew"
- If you like Certbot, please consider supporting our work by:

Donating to ISRG / Let's Encrypt: https://letsencrypt.org/donate
Donating to EFF: https://eff.org/donate-le

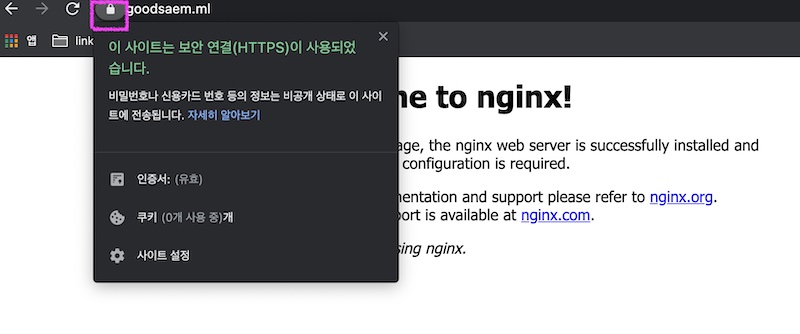
제되로 인증서 발급이 되었는지 확인해 보겠습니다.
domain에 보시면 goodsaem.ml 도메인이 등록되어 있습니다. 또한 9,10 라인에
fullchain.pem 키와 privkey.pem 파일이 정상 생성되었음을 확인할수 있습니다.

1,7,9-10 line

1
2
3
4
5
6
7
8
9
10
11
ubuntu@goodsaem:~$ sudo certbot certificates
Saving debug log to /var/log/letsencrypt/letsencrypt.log

- - - - - - - - - - - - - - - - - - - - - - - - - - - - - - - - - - - - - - - -
Found the following certs:
Certificate Name: goodsaem.ml
Domains: goodsaem.ml
Expiry Date: 2021-06-24 14:32:16+00:00 (VALID: 89 days)
Certificate Path: /etc/letsencrypt/live/goodsaem.ml/fullchain.pem
Private Key Path: /etc/letsencrypt/live/goodsaem.ml/privkey.pem
- - - - - - - - - - - - - - - - - - - - - - - - - - - - - - - - - - - - - - - -

nginx에 ssl 관련 설정이 등록되었는지 default.conf 내용을 확인해 보겠습니다.
51번라인부터 67번 라인까지 ssl 관련 설정이 자동으로 추가되었습니다.

1
2
3
4
5
6
7
8
9
10
11
12
13
14
15
16
17
18
19
20
21
22
23
24
25
26
27
28
29
30
31
32
33
34
35
36
37
38
39
40
41
42
43
44
45
46
47
48
49
50
51
52
53
54
55
56
57
58
59
60
61
62
63
64
65
66
67
68
69
70
server {
server_name goodsaem.ml;

#charset koi8-r;
#access_log /var/log/nginx/host.access.log main;

location / {
root /usr/share/nginx/html;
index index.html index.htm;
}

location /spring {
proxy_pass http://localhost:9090/spring;
proxy_set_header X-Real-IP $remote_addr;
proxy_set_header X-Forwarded-For $proxy_add_x_forwarded_for;
proxy_set_header Host $http_host;
}

#error_page 404 /404.html;

# redirect server error pages to the static page /50x.html
#
error_page 500 502 503 504 /50x.html;
location = /50x.html {
root /usr/share/nginx/html;
}

# proxy the PHP scripts to Apache listening on 127.0.0.1:80
#
#location ~ \.php$ {
# proxy_pass http://127.0.0.1;
#}

# pass the PHP scripts to FastCGI server listening on 127.0.0.1:9000
#
#location ~ \.php$ {
# root html;
# fastcgi_pass 127.0.0.1:9000;
# fastcgi_index index.php;
# fastcgi_param SCRIPT_FILENAME /scripts$fastcgi_script_name;
# include fastcgi_params;
#}

# deny access to .htaccess files, if Apache's document root
# concurs with nginx's one
#
#location ~ /\.ht {
# deny all;
#}

listen 443 ssl; # managed by Certbot
ssl_certificate /etc/letsencrypt/live/goodsaem.ml/fullchain.pem; # managed by Certbot
ssl_certificate_key /etc/letsencrypt/live/goodsaem.ml/privkey.pem; # managed by Certbot
include /etc/letsencrypt/options-ssl-nginx.conf; # managed by Certbot
ssl_dhparam /etc/letsencrypt/ssl-dhparams.pem; # managed by Certbot

}

server {
if ($host = goodsaem.ml) {
return 301 https://$host$request_uri;
} # managed by Certbot


listen 80;
server_name goodsaem.ml;
return 404; # managed by Certbot


}

letsencrypt 에 있는 Diffie-Hellman Key 를 아래와 같은 이름으로 백업합니다.

1
2
ubuntu@goodsaem:~$ cd /etc/letsencrypt/
ubuntu@goodsaem:~$ sudo mv ssl-dhparams.pem ssl-dhparams.pem.backup

생성한 키 파일을 /etc/letsencrypt 로 복사합니다.

1
ubuntu@goodsaem:~$  sudo cp -rp /etc/nginx/conf.d/ssl-dhparams.pem /etc/letsencrypt/

nginx 를 재시작 합니다.

1
ubuntu@goodsaem:~$ sudo systemctl restart nginx

3. http 요청 https 로 자동포워딩

http://goodsaem.ml/ 로 접속하면 https://goodsaem.ml/ 자동 포워딩되는지
확인합니다.

정상적으로 setup 되었다면 아래와 같은 화면을 확인할수 있습니다.

4. SSL 점검

SSL이 제되로 생성되었는지 https://www.ssllabs.com/ssltest/analyze.html 사이트에 접속하여
아래와 같이 도메인을 입력하고 점검을 수행합니다.

A 라고 연두색으로 나오는것 보니 제되로 설정이 된것 같습니다.

5. Springboot 백그라운드에서 실행

아래 명령어로 샘플 프로젝트를 실행하면 foreground 로 명령어가 실행됩니다. ctrl + c 키를 눌러서 종료하면 프로세스가 종료됩니다.
명령어를 실행하고 나서 로그아웃을 하더라도 명령어가 계속 실행된 상태로 있을려면 background 로 명령어가 실행되어야 합니다.

1
java -jar hello-0.0.1-SNAPSHOT.war

background로 실행하는 프로세스를 만들기 위해 아래와 같이 start.sh 파일을 생성합니다.

1
ubuntu@goodsaem:~$ vi start.sh

nohup을 사용하여 출력을 nohup.out으로 보내고 명령어를 실행한다음 & 같이 입력하여 백그라운드에서 실행 되게 만듭니다.

1
nohup java -jar hello*.war &

그리고 나서 start.sh 실행 권한을 부여 합니다.

1
ubuntu@goodsaem:~$ chmod +x start.sh

stop 스크립트를 작성합니다.

1
ubuntu@goodsaem:~$ vi stop.sh

아래와 같이 입력합니다.

1
2
3
4
5
6
7
8
9
10
#!/bin/sh

PID=`ps -ef | grep java | grep war | awk '{print $2}'`
if [ -n "$PID" ]
then
echo "=====spring is running at" $PID "Shutdown spring now"
kill -9 $PID
else
echo "=====spring isn't running====="
fi

저장하고 종료합니다.

log 출력 스크립트를 작성합니다.

1
ubuntu@goodsaem:~$ vi log.sh

아래와 같이 입력합니다.

1
tail -f nohup.out

stop.sh 와 log.sh 각각 실행권한을 부여합니다.

1
2
ubuntu@goodsaem:~$ chmod +X start.sh
ubuntu@goodsaem:~$ chmod +X log.sh

서비스를 시작합니다.

1
ubuntu@goodsaem:~$ ./start.sh;./log.sh

아래와 같은 로그 확인이 가능합니다.

1
2
3
4
5
6
7
8
9
10
11
12
13
14
15
16
17
18
  .   ____          _            __ _ _
/\\ / ___'_ __ _ _(_)_ __ __ _ \ \ \ \
( ( )\___ | '_ | '_| | '_ \/ _` | \ \ \ \
\\/ ___)| |_)| | | | | || (_| | ) ) ) )
' |____| .__|_| |_|_| |_\__, | / / / /
=========|_|==============|___/=/_/_/_/
:: Spring Boot :: (v2.4.4)

2021-03-27 02:23:27.115 INFO 3532 --- [ main] g.github.io.hello.HelloApplication : Starting HelloApplication using Java 1.8.0_282 on goodsaem with PID 3532 (/home/ubuntu/hello-0.0.1-SNAPSHOT.war started by ubuntu in /home/ubuntu)
2021-03-27 02:23:27.124 INFO 3532 --- [ main] g.github.io.hello.HelloApplication : No active profile set, falling back to default profiles: default
2021-03-27 02:23:29.570 INFO 3532 --- [ main] o.s.b.w.embedded.tomcat.TomcatWebServer : Tomcat initialized with port(s): 9090 (http)
2021-03-27 02:23:29.600 INFO 3532 --- [ main] o.apache.catalina.core.StandardService : Starting service [Tomcat]
2021-03-27 02:23:29.606 INFO 3532 --- [ main] org.apache.catalina.core.StandardEngine : Starting Servlet engine: [Apache Tomcat/9.0.44]
2021-03-27 02:23:30.416 INFO 3532 --- [ main] o.a.c.c.C.[.[localhost].[/spring] : Initializing Spring embedded WebApplicationContext
2021-03-27 02:23:30.416 INFO 3532 --- [ main] w.s.c.ServletWebServerApplicationContext : Root WebApplicationContext: initialization completed in 3156 ms
2021-03-27 02:23:31.421 INFO 3532 --- [ main] o.s.s.concurrent.ThreadPoolTaskExecutor : Initializing ExecutorService 'applicationTaskExecutor'
2021-03-27 02:23:31.886 INFO 3532 --- [ main] o.s.b.w.embedded.tomcat.TomcatWebServer : Tomcat started on port(s): 9090 (http) with context path '/spring'
2021-03-27 02:23:31.908 INFO 3532 --- [ main] g.github.io.hello.HelloApplication : Started HelloApplication in 6.02 seconds (JVM running for 6.993)

이제 ctrl + c 를 해도 프로세스가 종료되지 않습니다.

::: tip 서비스 종료
아래 명령어로 서비스를 종료 합니다.

1
2
ubuntu@goodsaem:~$ ./stop.sh;./log.sh
=====spring is running at 3532 Shutdown spring now

:::

다시 서비스를 시작합니다.

1
ubuntu@goodsaem:~$ ./start.sh;./log.sh

6. 테스트

이제 실제로 https 로 접속을 시도해 보겠습니다. http://goodsaem.ml/spring/goodsaem/string https 프로토콜을 이용하여
설정한 도메인으로 접속하니 아래 그림과 같이 정상적으로 화면이 나왔습니다.

공유하기