3/8 mac+php+mariadb+nginx+ssl 설정

3. Nginx 설치

Linux + Nginx + MariaDB + PHP 조합의 LEMP 설치를 진행하겠습니다. 첫번째로 Nginx 에 대해서 설치 하겠습니다.

1. Nginx 현위치

https://news.netcraft.com/archives/category/web-server-survey/
netcrat의 21년 웹서버 점유율을 보면 아래와 같습니다. 비동기로 동작하는 nginx 는 apache 보다 가볍고 속도도 더 빠르다고 합니다.
아래 데이터를 보더라도 nginx 가 apache 를 앞지르고 있는것으로 보입니다. 그래서 저도 nginx 로 설정하겠습니다.

Developer December 2020 Percent January 2021 Percent Change
nginx 411,191,213 33.48% 399,330,927 33.33% -0.15
Apache 332,420,092 27.07% 316,046,149 26.38% -0.69
Microsoft 97,532,495 7.94% 89,781,136 7.49% -0.45
Google 46,924,883 3.82% 46,190,660 3.86% 0

2. Nginx 버전

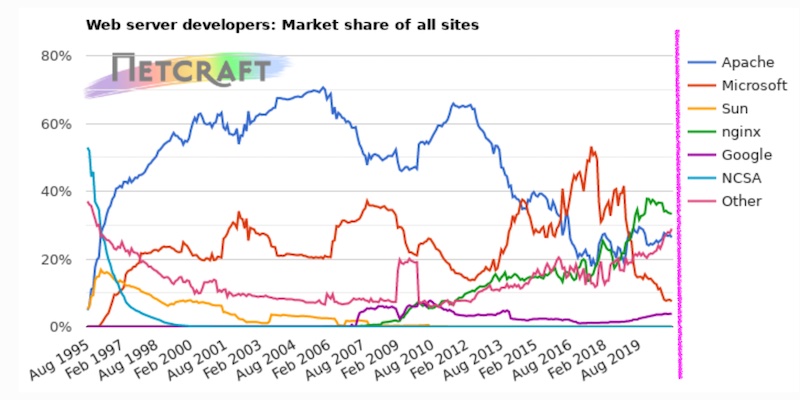
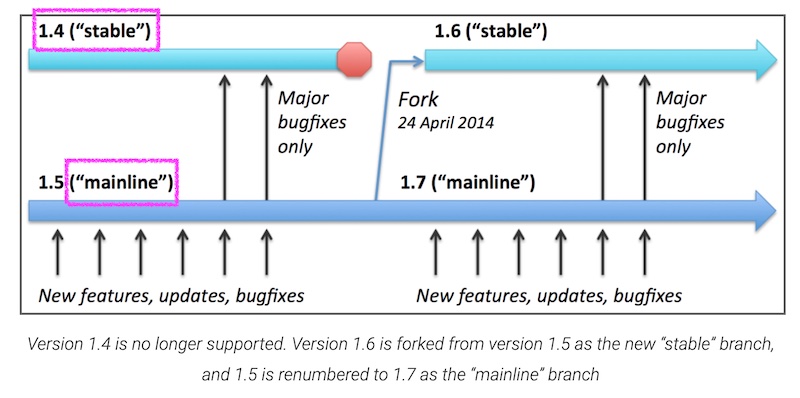
Nginx는 MainLine 버전과 stable 버전 2가지가 존재 합니다. 메인라이는 새로운 기능 및 업데이트 및 버그 패치가 동시에 진행되고 stable 은
메인라인에서 버그패치만 진행하는 버전입니다. 메이저 버전을 올리고 싶지 않고 사용하고 싶다면 stable 버전이 좋겠지만 전 최신 기능과 update
및 버그 픽스가 동시에 이루어지는 mainline으로 설치를 진행하겠습니다.

3. 설치

Nginx 설치를 위해 의존성 있는 패키지 설치를 진행합니다.

1
goodsaem@goodsaem:~$ sudo apt install curl gnupg2 ca-certificates lsb-release -y

메인라인 패키지 리스트를 추가 합니다.

1
2
goodsaem@goodsaem:~$ sudo echo "deb http://nginx.org/packages/mainline/ubuntu `lsb_release -cs` nginx" | sudo tee /etc/apt/sources.list.d/nginx.list
deb http://nginx.org/packages/mainline/ubuntu bionic nginx

패키지를 업데이트 합니다.

1
sudo apt update

업데이트시 아래와 같이 NO_PUBKEY ABF5BD827BD9BF62 에러가 발생한다면 키를 업데이트 합니다.

1~5 라인
1
2
3
4
5
6
7
8
9
10
11
12
13
goodsaem@goodsaem:~$ sudo apt update
Hit:1 http://kr.archive.ubuntu.com/ubuntu bionic InRelease
Get:2 http://nginx.org/packages/mainline/ubuntu bionic InRelease [2862 B]
Err:2 http://nginx.org/packages/mainline/ubuntu bionic InRelease
The following signatures couldn't be verified because the public key is not available: NO_PUBKEY ABF5BD827BD9BF62
Hit:3 http://kr.archive.ubuntu.com/ubuntu bionic-updates InRelease
Hit:4 http://kr.archive.ubuntu.com/ubuntu bionic-backports InRelease
Hit:5 http://kr.archive.ubuntu.com/ubuntu bionic-security InRelease
Reading package lists... Done
W: GPG error: http://nginx.org/packages/mainline/ubuntu bionic InRelease: The following signatures couldn't be verified because the public key is not available: NO_PUBKEY ABF5BD827BD9BF62
E: The repository 'http://nginx.org/packages/mainline/ubuntu bionic InRelease' is not signed.
N: Updating from such a repository can't be done securely, and is therefore disabled by default.
N: See apt-secure(8) manpage for repository creation and user configuration details.

1번 라인과 같이 키를 업데이트 합니다.

1
2
3
4
5
6
goodsaem@goodsaem:~$ sudo apt-key adv --keyserver keyserver.ubuntu.com --recv-keys ABF5BD827BD9BF62
Executing: /tmp/apt-key-gpghome.2V0gKSSHqy/gpg.1.sh --keyserver keyserver.ubuntu.com --recv-keys ABF5BD827BD9BF62
gpg: key ABF5BD827BD9BF62: 14 signatures not checked due to missing keys
gpg: key ABF5BD827BD9BF62: public key "nginx signing key <signing-key@nginx.com>" imported
gpg: Total number processed: 1
gpg: imported: 1

nginx 를 설치합니다.

1
goodsaem@goodsaem:~$ sudo apt install nginx

설치된 버전을 확인 합니다. 1.19.8 최신 버전으로 설치 되었습니다.

1
2
3
4
5
6
goodsaem@goodsaem:~$ nginx -V
nginx version: nginx/1.19.8
built by gcc 7.5.0 (Ubuntu 7.5.0-3ubuntu1~18.04)
built with OpenSSL 1.1.1 11 Sep 2018
TLS SNI support enabled
configure arguments: --prefix=/etc/nginx --sbin-path=/usr/sbin/nginx --modules-path=/usr/lib/nginx/modules --conf-path=/etc/nginx/nginx.conf --error-log-path=/var/log/nginx/error.log --http-log-path=/var/log/nginx/access.log --pid-path=/var/run/nginx.pid --lock-path=/var/run/nginx.lock --http-client-body-temp-path=/var/cache/nginx/client_temp --http-proxy-temp-path=/var/cache/nginx/proxy_temp --http-fastcgi-temp-path=/var/cache/nginx/fastcgi_temp --http-uwsgi-temp-path=/var/cache/nginx/uwsgi_temp --http-scgi-temp-path=/var/cache/nginx/scgi_temp --user=nginx --group=nginx --with-compat --with-file-aio --with-threads --with-http_addition_module --with-http_auth_request_module --with-http_dav_module --with-http_flv_module --with-http_gunzip_module --with-http_gzip_static_module --with-http_mp4_module --with-http_random_index_module --with-http_realip_module --with-http_secure_link_module --with-http_slice_module --with-http_ssl_module --with-http_stub_status_module --with-http_sub_module --with-http_v2_module --with-mail --with-mail_ssl_module --with-stream --with-stream_realip_module --with-stream_ssl_module --with-stream_ssl_preread_module --with-cc-opt='-g -O2 -fdebug-prefix-map=/data/builder/debuild/nginx-1.19.8/debian/debuild-base/nginx-1.19.8=. -fstack-protector-strong -Wformat -Werror=format-security -Wp,-D_FORTIFY_SOURCE=2 -fPIC' --with-ld-opt='-Wl,-Bsymbolic-functions -Wl,-z,relro -Wl,-z,now -Wl,--as-needed -pie'

4. Nginx 시작

아래 명령어를 입력하여 nginx 를 시작합니다.

1
goodsaem@goodsaem:~$ sudo systemctl start nginx

virtualbox 설정 네트워크 고급 포트 포워딩에서 80 과 443 포트를 아래와 같이 추가합니다.

웹브라우저에서 http://localhost 접속해서 아래와 같은 화면이 나오면 설정 완료 입니다.

공유하기